
Mastering Conversational Support: Merging GPT with WhatsApp
Mastering Conversational Support: Merging GPT with WhatsApp
Today’s businesses embrace messaging apps like WhatsApp to communicate with customers. This results in a surge in the automation of business customer interactions using chatbots.
MUO VIDEO OF THE DAY
SCROLL TO CONTINUE WITH CONTENT
Such a chatbot is ChatGPT, a large language model by OpenAI that you can integrate with WhatsApp to automate customer interactions by providing fast and accurate responses to customer queries.
Understanding and Accessing the ChatGPT API
Before integrating with WhatsApp, it is essential to get a basic understanding of ChatGPT and ChatGPT API . ChatGPT is a generative large language model that receives text-based queries and returns human-like responses. OpenAI provides a simple API interface for developers to access and use ChatGPT’s GPT-3.5 and GPT-4 models.
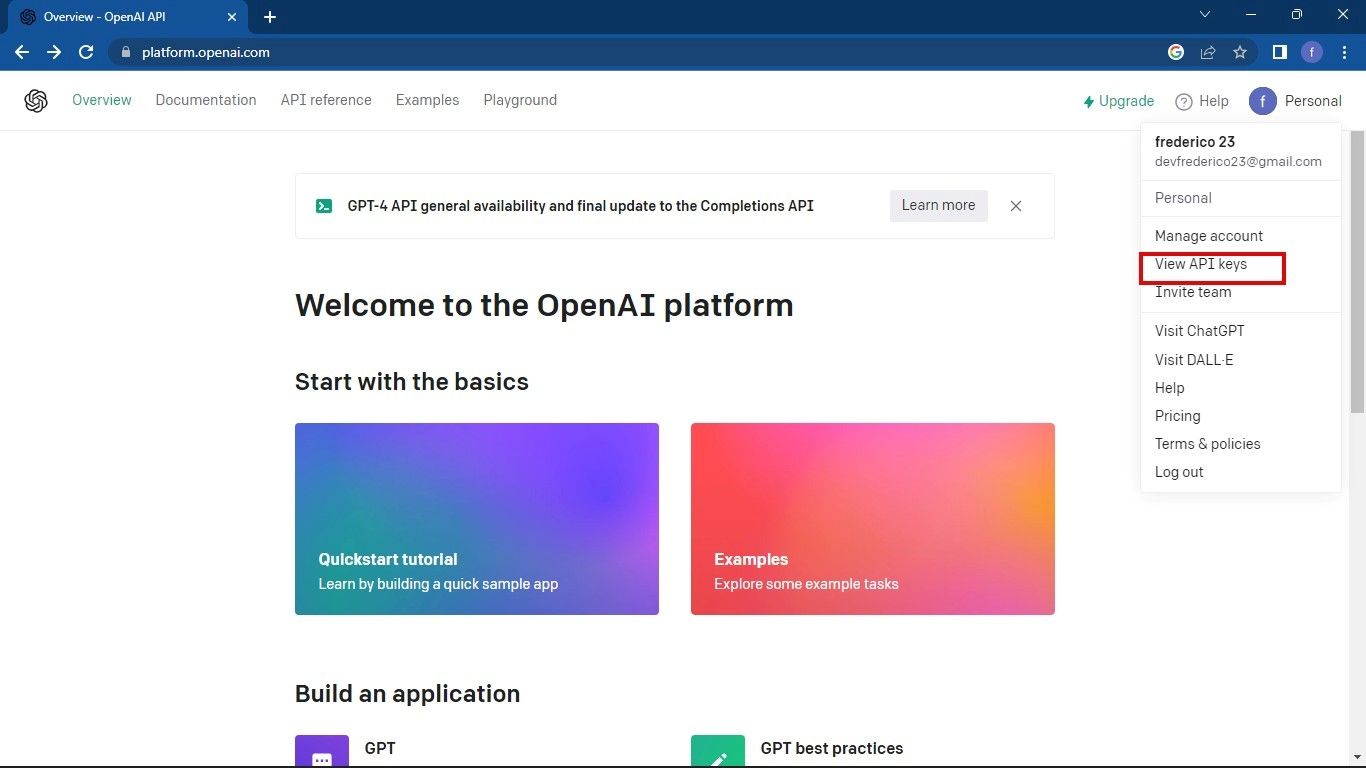
To access ChatGPT API keys, you need to navigate to the OpenAI API platform. After signing in, click on the profile icon. Then, click on the View API keys option.
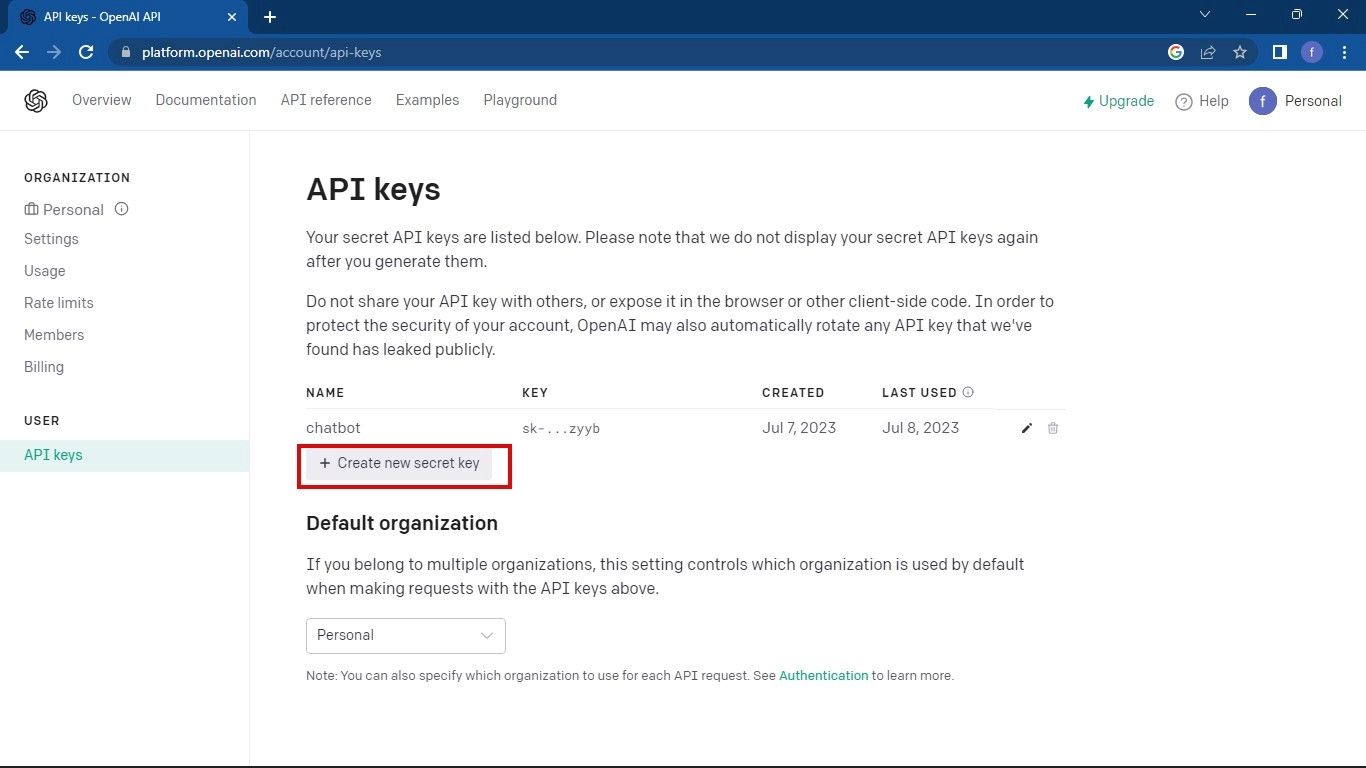
Next, click the Create new secret key button to create a new API key.
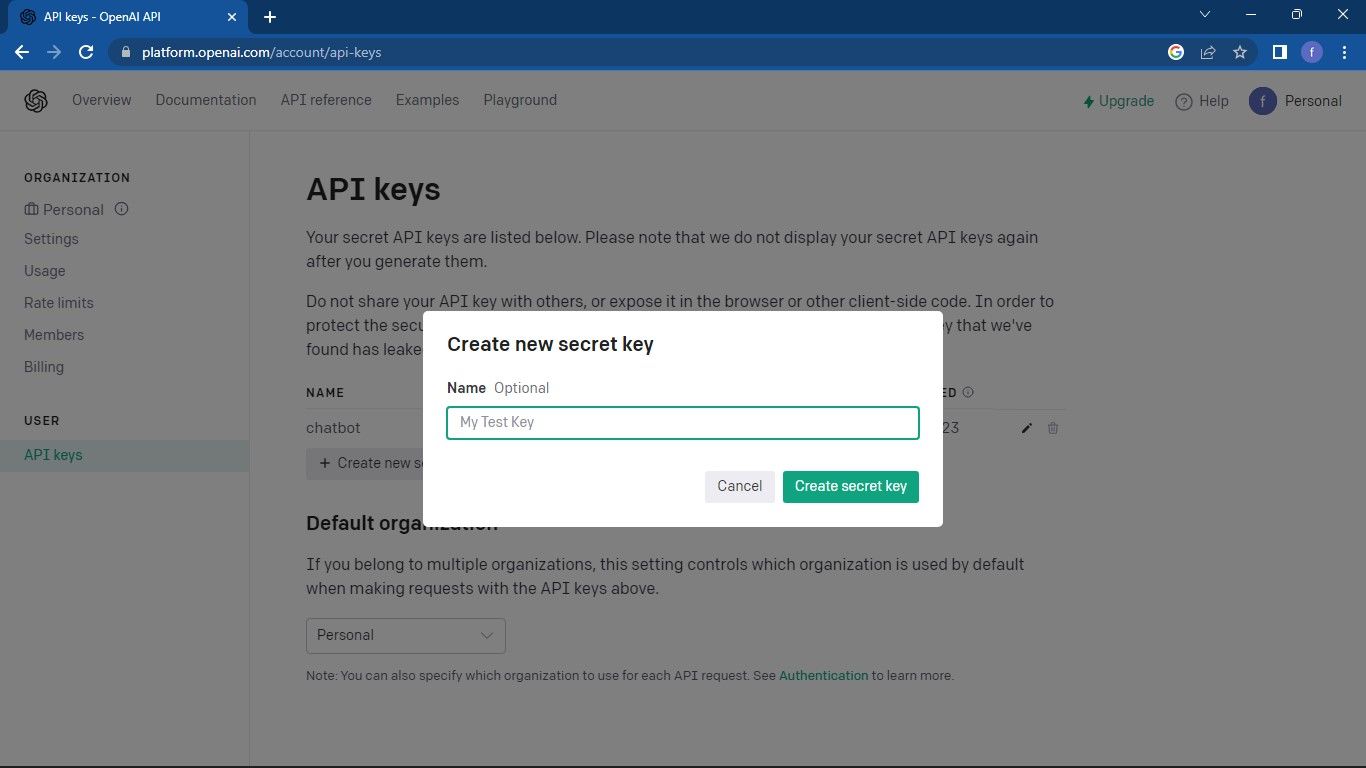
Enter the requested details, i.e., the name of the key.
A secret key will prompt.
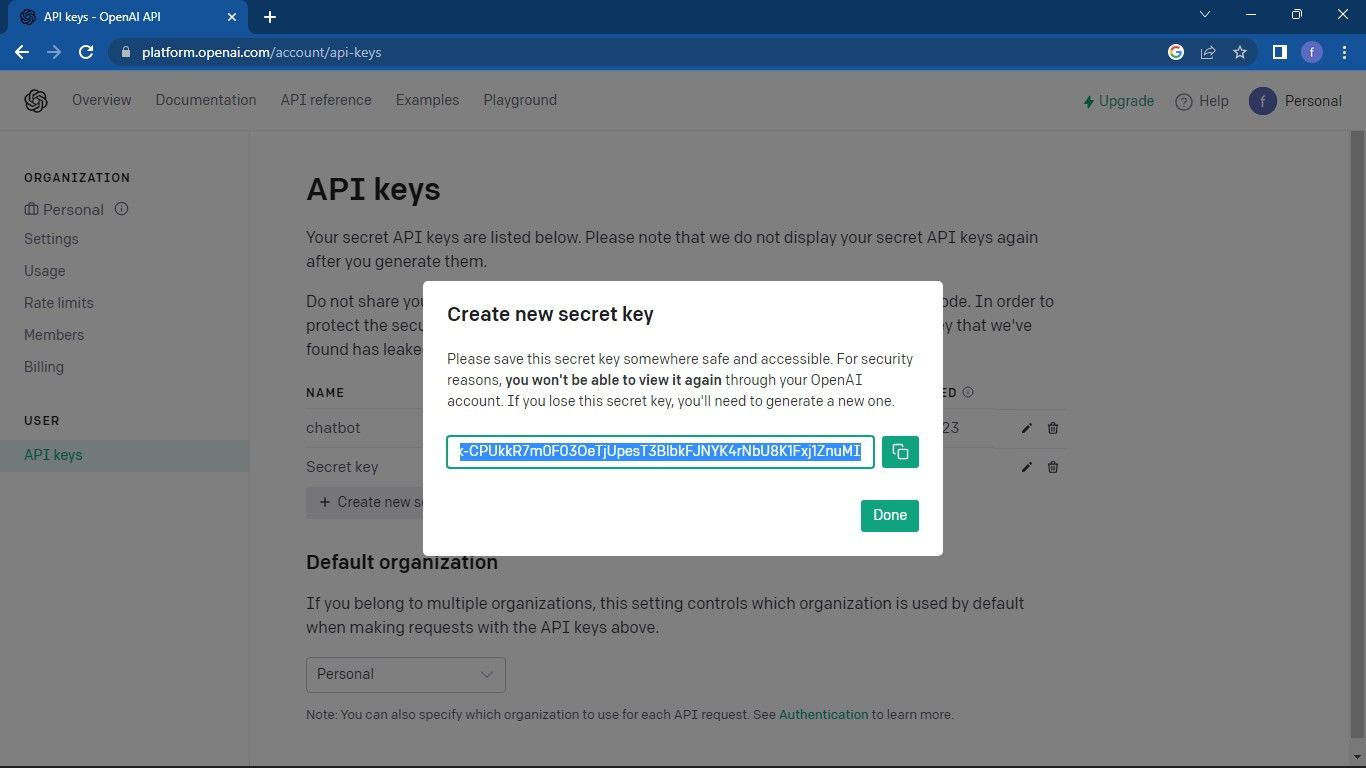
Copy and store the key in a secure place for future use.

Setting Up a WhatsApp Business Account
To integrate ChatGPT with WhatsApp, you must set up a WhatsApp Business account. Note that WhatsApp Business is different from regular WhatsApp . This account will allow you to access the WhatsApp Business API , which you will integrate with the ChatGPT API.
The full source code is available in a GitHub repository .
You can use a third-party service like Kommunicate, a WhatsApp chatbot, or a Python script to integrate ChatGPT with WhatsApp. This tutorial’s focus will be on integrating ChatGPT using a Python script. It will then give you an overview of integration using a WhatsApp chatbot.

Using Python Script to Integrate WhatsApp With ChatGPT API
Before you start the development, create a virtual environment for your application using Pipenv as follows:
pipenv install django djangorestframework openai
This command will install the django, djangorestframework, and openai packages.
Then, create a new Django project.
django-admin startproject whatsapp
Navigate to the created whatsapp directory and create a Django app named gpt:
py manage.py startapp gpt
In the whatsapp/settings.py file, add the new app, gpt on the installed apps list as follows:
INSTALLED_APPS = [ 'django.contrib.admin', 'django.contrib.auth', 'django.contrib.contenttypes', 'django.contrib.sessions', 'django.contrib.messages', 'django.contrib.staticfiles', 'rest_framework', 'gpt', ]
In your whatsapp/urls.py file, add the gpt app URL. This will redirect to the URLs you will create on the gpt app:
`from django.contrib import admin
from django.urls import path, include
urlpatterns = [
…
path(‘api/‘, include(‘gpt.urls’)), # gpt app URL
]`
On the gpt/views.py file, add the following block of code to create ChatGPT API view:
`from rest_framework.response import Response
import openai
from rest_framework.views import APIView
class OpenAIGPTView(APIView):
def get(self, request):
input = request.GET.get(‘q’)
openai.api_key = “ENTER_OPENAI_API_KEY”
completion = openai.ChatCompletion.create(
model=”gpt-3.5-turbo”,
messages=[{“role”: “user”, “content”: input}]
)
answer = completion [‘choices’][0][‘message’][‘content’]
return Response(answer)`
The view sets up an API endpoint that expects a GET request with a query parameter q comprising the user input. It then uses OpenAI’s gpt-3.5-turbo model to generate a response based on the provided input and returns the response as the API’s output.
Next, create a urls.py file and register the API view by adding the following lines of code:
`from django.urls import path
from .views import *
urlpatterns = [
path(‘chat’, OpenAIGPTView.as_view()),
]`
Run the migrate and runserver commands as follows:
python manage.py migrate python manage.py runserver
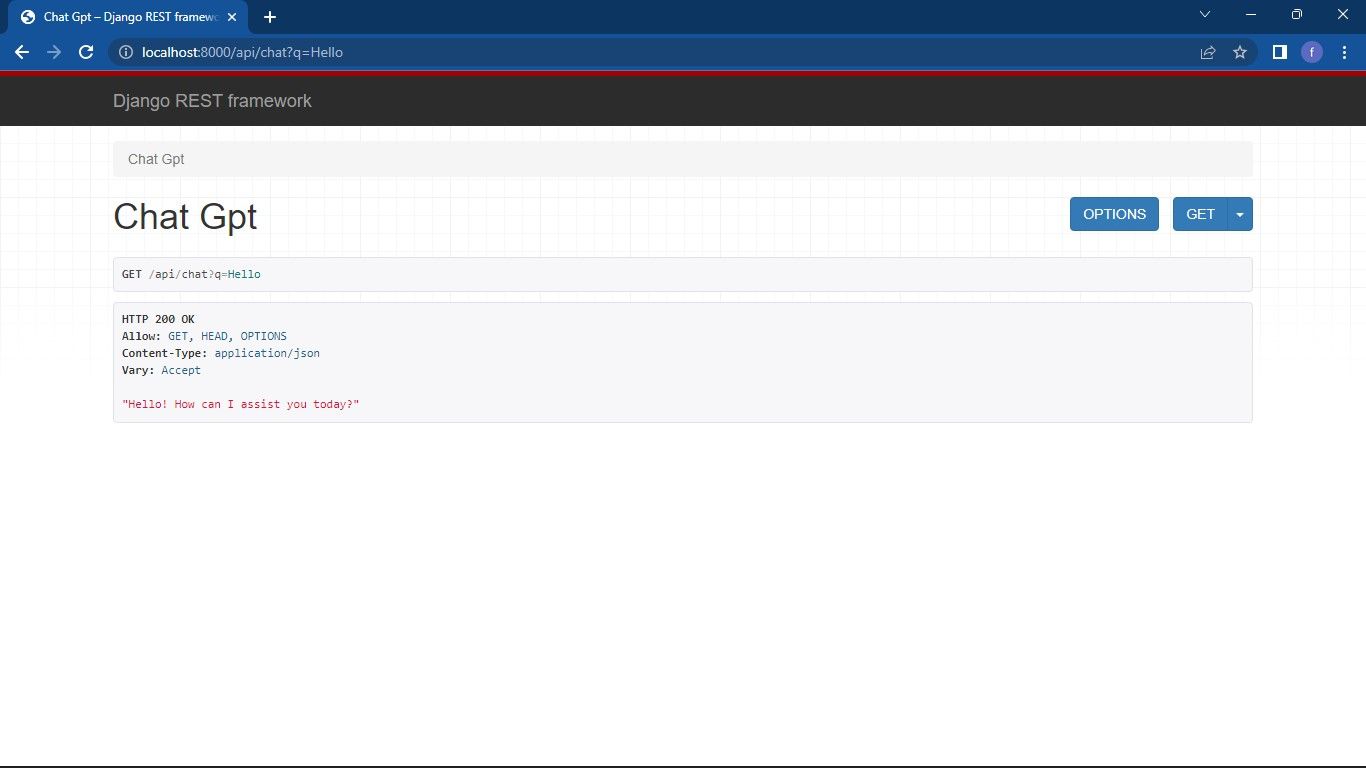
Test the /api/chat endpoint by sending a GET request to http://localhost:8000/api/chat?q=Hello .
Expected output:
Next, install Go if it is not already installed on your machine.
Clone the Whatsmeow client using the command below:
git clone https://github.com/Huskynarr/whatsapp-gpt.git
Navigate to the repository, whatsapp-gpt, and on the file, main.go update this line:
url := "http://localhost:5001/chat?q=" + urlEncoded
to:
url := "http://127.0.0.1:8000/api/chat?q=" + urlEncode
Save the changes and run the file:
go run main.go
The application will prompt you with a QR code to log in to your WhatsApp account.
Expected output:

Move to your WhatsApp mobile app and navigate to Settings > QR code > Scan code to add a new linked device and scan the popped QR code on your terminal.
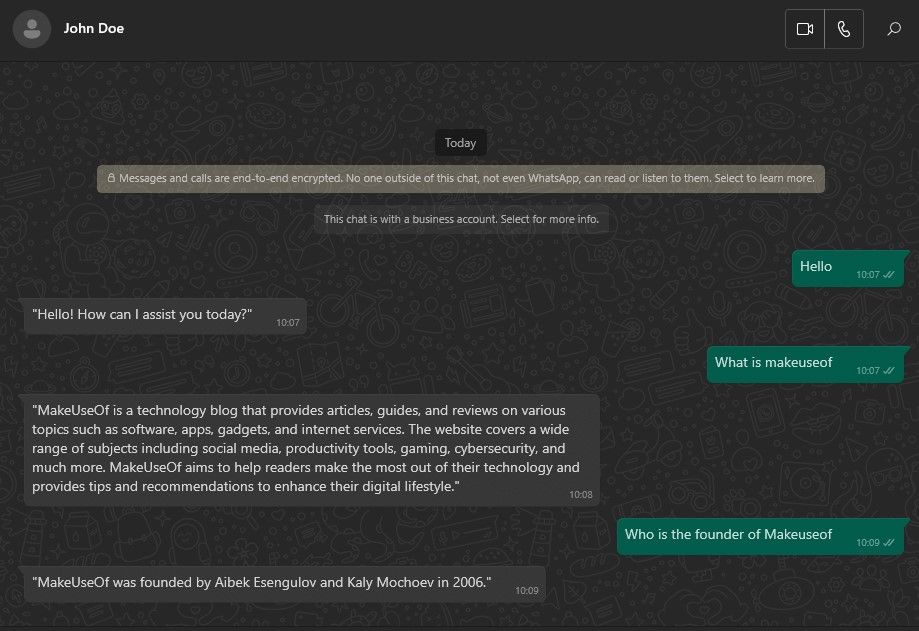
After logging in, the application will start listening to incoming messages. If someone sends a message, the received message will make a GET request to API with the message as a query parameter and send the response back to the sender on WhatsApp.
Expected output:
Using WhatsApp Chatbot to Integrate WhatsApp With ChatGPT API
Another way to integrate ChatGPT into WhatsApp messages is by using a WhatsApp chatbot.
Once you register your WhatsApp Business API, use a chat builder like OpenDialog to create a flow for the chat. You will then test your chatbot and add it to your mobile phone.

Integrate OpenAI API With Your WhatsApp Chatbot
To integrate your WhatsApp chatbot with OpenAI models, use the API key from OpenAI.
Integrating WhatsApp chatbots with OpenAI GPT models presents a risk of WhatsApp blocking your account on security claims.
Though this method is easier if you already have a chatbot, you should only opt for it once you’re comfortable with the risks involved.
 EmEditor Professional (Lifetime License, non-store app)
Configuring Automated Responses
To get better customer service, configure automated responses to provide fast and accurate responses to customer messages. These responses will personalize the customer by name and provide relevant responses to customer queries.
Testing Your WhatsApp Chatbot
Like all AI API systems, testing is key before you deploy your WhatsApp chatbot. This is to ensure that it works as expected. API testing tools like Postman and Curl can help to test your chatbot’s responses.
In this case, the Django REST framework provides a browsable API to help test API requests and responses.
Measuring Success and Fine-Tuning
Once your WhatsApp chatbot is in deployment, it is crucial to measure its success and usage over time. This will help with fine-tuning it accordingly. Analytics tools like OpenDialog and Rasa can help to track metrics such as response time, retention rate, and customer satisfaction.
Streamline Customer Support on WhatsApp With ChatGPT Integration
OpenAI’s GPT-3.5 or GPT-4 models can handle large volumes of inquiries, provide instant responses, and use advanced language processing, making it a better solution for customer service interactions. By integrating ChatGPT with WhatsApp, you can save time, improve customer satisfaction, and streamline communication. Several other large language models could also improve your chatbot’s performance.
SCROLL TO CONTINUE WITH CONTENT
Such a chatbot is ChatGPT, a large language model by OpenAI that you can integrate with WhatsApp to automate customer interactions by providing fast and accurate responses to customer queries.
- Title: Mastering Conversational Support: Merging GPT with WhatsApp
- Author: Brian
- Created at : 2024-08-15 02:40:30
- Updated at : 2024-08-16 02:40:30
- Link: https://tech-savvy.techidaily.com/mastering-conversational-support-merging-gpt-with-whatsapp/
- License: This work is licensed under CC BY-NC-SA 4.0.